White Background Product Photography: A Seller's Guide
Summary
White background product photography needs three things: a backdrop that reads RGB 255,255,255, a product filling about 85% of the frame, and a long side of at least 1000 pixels. Light the background about two stops brighter than the product, keep one soft contact shadow, and check the corners with a colour picker. Fix small greys in editing, reshoot anything blurry or cropped too tight, and consider AI background tools once you pass about 20 products.

White background product photography comes down to three numbers: a background that reads RGB 255,255,255, a product that fills about 85% of the frame, and a long side of at least 1000 pixels. Hit those and most marketplaces accept the image. Miss one and you get a grey halo, a rejected main image, or a thumbnail that looks cheap next to the listing above yours.
This guide covers the setup, the exposure logic, the white-on-white trap, and the point where you stop shooting and let software finish the job.
What does "white background" actually mean to a marketplace?
It means pure white, not "light". Amazon's main image rules, as summarised by seller guides such as Dresma, call for RGB 255,255,255, no props, no text and no badges. Several guides add that even 252,252,252 can get flagged by automated checks.
Google Shopping is looser. White or neutral is a safe default there, but the real rule is a clean, unobstructed product view with no watermark, border or promotional overlay.
Etsy does not force white at all. A white main image still helps in a search grid, because it gives every thumbnail the same visual weight and makes colour comparison easier.
The useful question is not "does it look white to my eye?" It is "does a colour picker read 255 on the corners?" Your eyes will lie to you. A picker will not.
What gear do you actually need for a white background shoot?
Less than you think. A white sweep, one soft light source and one reflector cover most small products.
Backdrop: a white paper roll or a curved sheet of white poster board. The curve removes the horizon line where table meets wall.
Light: a window with a white curtain, or one softbox. Hard direct light means hard shadows and a longer edit.
Reflector: a white foam board on the shadow side. It costs a few dollars and does more than a second light.
Camera: a phone on a tripod is fine. The tripod matters more than the sensor, because it keeps every shot in a catalogue framed the same way.
Skip the lightbox cubes sold for tiny items if your products are bigger than a coffee mug. They cap your angles and flatten the light.
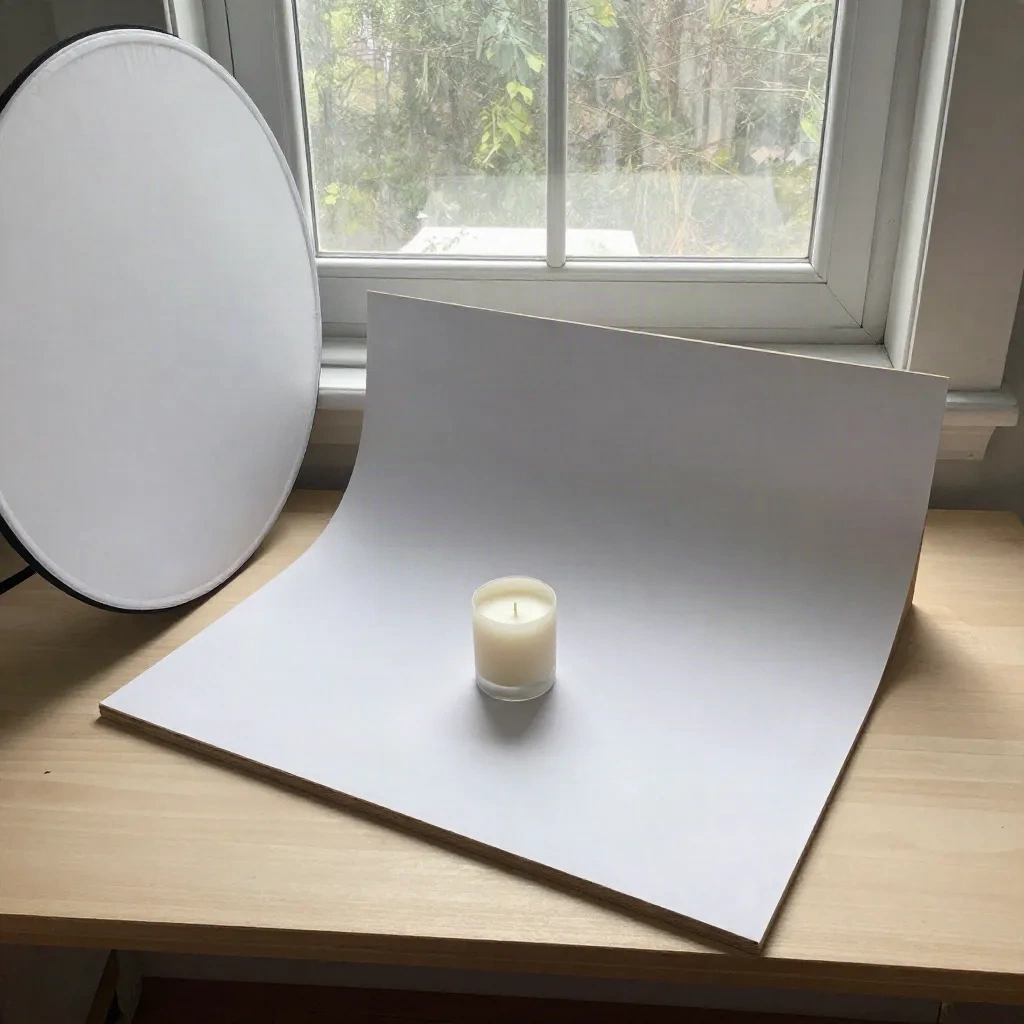
That window setup is the cheapest rig that works. Poster board curved against a wall, window light from the side, a foam board opposite. In practice, it takes about 10 minutes to build and costs less than a takeaway lunch.
Why does the background come out grey even when it looks white?
Because a camera exposes for the product, not the backdrop. If you meter on the mug, the white paper behind it lands around 200 on a 0-255 scale. That reads as a soft grey.
The fix is to light the background separately. A common rule from studio guides like Soona's is to push the background about two stops brighter than the subject. That is what makes it clip to pure white while the product keeps its detail.
Here is the logic in three moves.
Expose for the product first, so labels and texture look right.
Add light to the backdrop until it reads brighter than the product, not equal to it.
Check the histogram. You want a spike at the far right edge for the background, and the product's tones sitting clear of it.
Don't overdo step 2. Too much light on the backdrop wraps around the edges of the product and washes out the outline. Glossy items such as ceramics and glass suffer most.

Keep a soft contact shadow under the product. A product floating with zero shadow looks pasted on, and marketplaces do not require it gone. They require the background to be white, and a faint shadow underneath is part of the product, not the background.
How do you shoot a white product on a white background?
This is where most sellers lose a day. White candles, white porcelain, white leather, white cosmetics. The product and the backdrop compete for the same brightness, and the edge disappears.
The usual fix is counterintuitive: let the product go slightly grey. Light the backdrop hard so it clips, and keep the product one notch darker so a clean edge survives. Then add a tiny bit of shadow on the side opposite the key light to define the form.
Skip the trick of dropping a black card beside the product to carve an edge. It works on glass and polished metal, but on matte white goods it leaves a dark stripe along one side that reads as a lighting mistake.
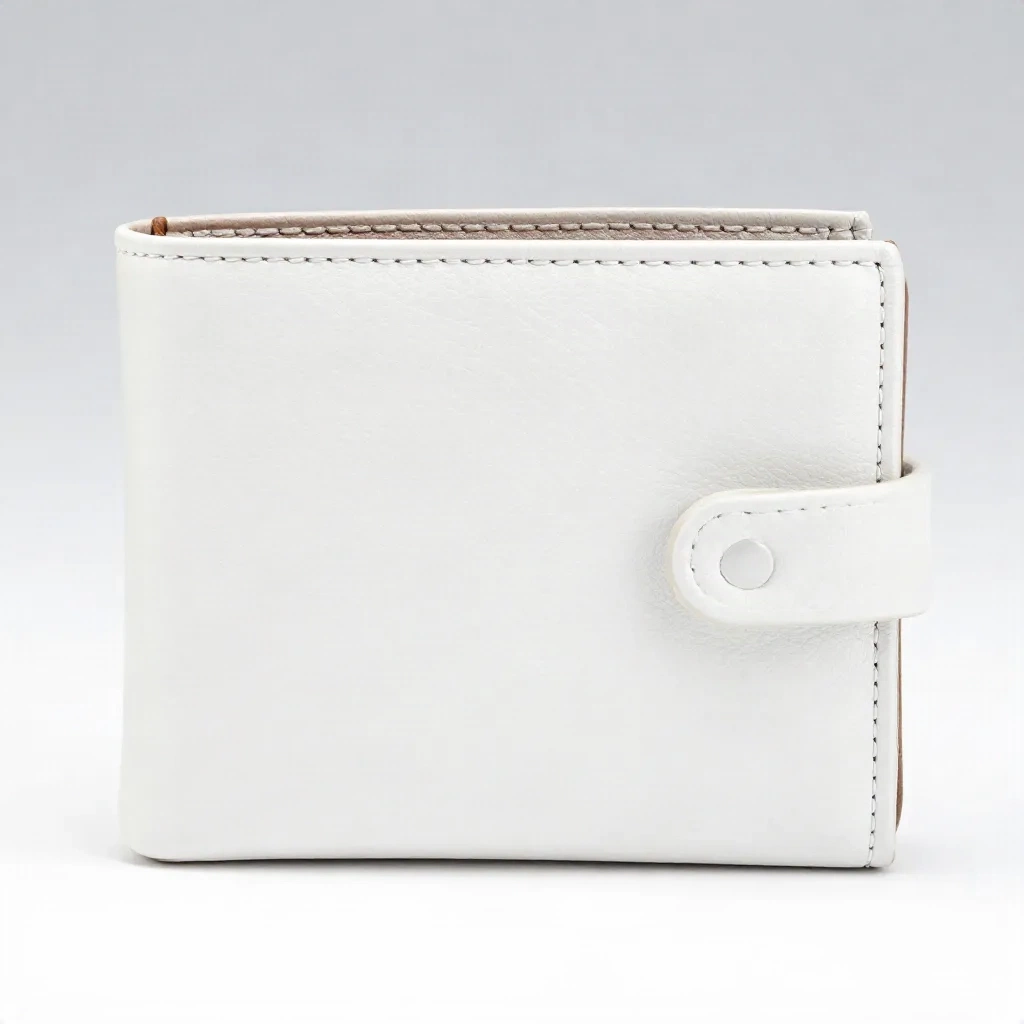
Here is the exact problem: the wallet above sits on a background that drifts from grey at the top to near-white at the bottom. To a person scrolling, it looks fine. To an automated main-image check, the top corners fail. A backdrop with a gradient is the most common reason a clean-looking shot gets rejected.
What should you fix in editing, and what should you reshoot?
Editing is for the last 5%. Raise the white point with Levels or Curves until the corners hit 255, then check the product has not lost its edges. If the product edge now looks eaten, reshoot with more separation instead of pushing further.
Fix in post:
A slightly grey backdrop (one Levels adjustment).
Dust, stray hairs and paper creases (clone or heal).
Colour cast from a warm window (white balance on the backdrop).
Reshoot instead:
Motion blur or a missed focus plane.
A product that fills 60% of the frame. Cropping to reach 85% costs you resolution and drops you under the 1000 pixel zoom line.
Heavy reflections from a glossy surface.
Frame for the crop before you shoot. If your final image must be square and 2000 pixels on a side, shoot wide enough that the product fills the frame at that size, not smaller.
When does AI beat a physical white background?
Past roughly 20 products, the maths changes. Reshooting a catalogue every time you add a colourway is slow, and the setup drifts between sessions: slightly different light, slightly different grey.
AI background tools solve the consistency problem. You shoot the product with decent light on any clean surface, and the tool cuts it out and places it on pure white with a generated shadow. Photoroom does background removal, batch edits and marketplace publishing in one app. Pebblely focuses on quick generated backgrounds with bulk generation.
Be honest about the limits. Cutouts fail on fine detail: fringed fabric, wire, hair, transparent glass. Zoom to 200% on every output before you upload, and look at the edges, not the whole image.
For brands that need one look across a full line, a studio-style platform fits better than a background remover. Klayn turns a single product photo into packshots and virtual sets, and keeps the lighting and décor consistent across the catalogue. That is the right call when the white-background shot is only one of several images per listing.
If you sell through your own storefront rather than only on marketplaces, the image pipeline is only half the job. A store builder such as WiziShop handles the product pages those photos land on.
The question that matters is not "AI or physical?" It is "how many products, and how often do they change?" Under 10 products, a window and a foam board win on cost. Above 50, automation wins on time.
How big should the file be, and what about shadows on marketplaces?
Shoot at the largest size your camera gives you, then export for the channel. Two thousand pixels on the long side leaves room for zoom on Amazon and for retina screens on your own store. Anything under 1000 pixels loses the zoom feature on Amazon, which tends to hurt conversion on higher-priced items.
Shadows deserve a rule too. Keep one soft shadow directly under the product, and nothing cast sideways onto the backdrop. A long side shadow tells a buyer the photo was taken on a desk. A tight contact shadow tells them the product is sitting on a surface, which is all you want.
Finally, name your files. A file called white-ceramic-mug-front.webp helps both your own catalogue and image search. IMG_4471 helps no one.
What does a repeatable workflow look like?
Here is the version that holds up across a catalogue, whether you shoot yourself or hire someone.
Fix the camera position. Mark the tripod and the product spot with tape so every item is framed the same way.
Shoot a grey card or a white reference frame first so you can match exposure from session to session.
Shoot wide. Leave room to crop to 85% fill without dropping below 2000 pixels.
Batch the white point. Apply one Levels adjustment to the whole set, then spot-check five images.
Export at the marketplace spec. Square, sRGB, long side 2000 pixels, file size small enough to load fast.
Run a corner check. Sample the four corners of each image with a colour picker. All four should read 255.
A 40-item batch with this routine is realistic in an afternoon. Without it, the same batch drifts into 40 slightly different whites, and you will see it in the grid.
Skip pure-white paper for glossy products if you cannot control reflections. Use a light grey sweep and brighten in post instead.
Skip over-editing. A product pushed to clipped highlights loses its texture, and buyers notice when the photo no longer matches the item that arrives.
Worth doing: a second image on a lifestyle scene. The white shot gets you through the marketplace gate. The scene image is what sells the mood. Keep both, and treat the white background as the baseline, not the whole listing.
Worth doing too: test one change at a time. Swap the main image on a single listing, leave the rest alone, and compare views and conversion over a few weeks before you roll it out.